How to Decorate Cookies

Decorating cookies with royal icing is a delightful and creative process. Here’s a step-by-step guide to help you get beautifully decorated cookies:
Materials Needed
  • Cookies (sugar cookies work well)
  • Royal icing (in desired colors)
  • Piping bags
  • Piping tips (different sizes)
  • Toothpicks or scribe tools
  • Food coloring
  • Small bowls for mixing colors
  • Water
  • Paper towels
  • Cooling racks
Step-by-Step Process
1. Prepare the Cookies
  • Bake the Cookies: Make sure your cookies are baked and completely cooled before starting. Sugar cookies are a popular choice because they hold their shape well.
  • Level the Surface: Ensure your cookies have a flat surface for easier decorating.
2. Make the Royal Icing
  • Basic Recipe: Mix powdered sugar, meringue powder (or egg whites), and water to the right consistency. The ratio is typically 2 cups of powdered sugar to 2 tablespoons of meringue powder and 3-4 tablespoons of water.
  • Mix Until Stiff Peaks Form: Beat the mixture until it forms stiff peaks. This is your base royal icing.
  • Color the Icing: Divide the icing into small bowls and add food coloring as desired. Mix well to achieve even coloring.

3. Determine Icing Consistencies

  • Stiff Consistency: For outlining and details. Should hold a peak and not spread.
  • Flood Consistency: For filling in areas. When you drizzle it back into the bowl, it should smooth out in about 10-15 seconds.

4. Fill Piping Bags

  • Use piping bags with couplers and tips to allow for easy changing of tips.
  • Fill the bags with the appropriate consistency icing. Use smaller piping tips (like #1 or #2) for fine details and larger tips (like #3 or #4) for flooding.

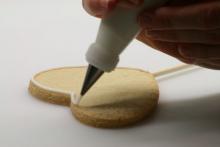
5. Outline the Cookies

  • Using the stiff consistency icing, outline the edge of each cookie. This creates a barrier for the flood icing.
  • Allow the outline to set for a few minutes before moving on to flooding.

6. Flood the Cookies

  • Using the flood consistency icing, fill in the outlined area. You can use a piping bag or a squeeze bottle for more control.
  • Use a toothpick or scribe tool to spread the icing and pop any air bubbles.
7. Dry the Base Layer
  • Let the base layer dry completely before adding more details. This can take several hours or overnight.
8. Add Details
  • Use the stiff consistency icing for adding details like lines, dots, and other designs.
  • For layering colors (like wet-on-wet technique), work quickly before the base layer dries.
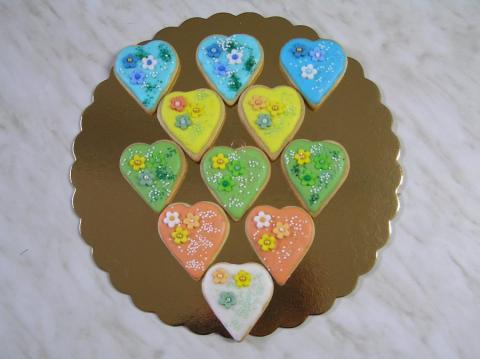
9. Finishing Touches
  • Add any final decorations, such as sprinkles or edible glitter, while the icing is still wet.
  • Let the cookies dry completely before handling or packaging. This ensures the icing sets properly and won’t smudge.
10. Store Properly
  • Store decorated cookies in an airtight container at room temperature. They can last for about a week.
Tips for Success
  • Practice Piping: Practice your piping on parchment paper before decorating the actual cookies.
  • Experiment with Techniques: Try different techniques like marbling, wet-on-wet, or using stencils.
  • Keep Icing Covered: Royal icing dries out quickly, so keep it covered with a damp cloth when not in use.
By following these steps, you’ll be able to create beautifully decorated cookies with royal icing. Enjoy the process and let your creativity shine!
Questions and answers:
Use the right royal icing consistency ?
main consistencies you will work with:
  1. Piping Consistency
  2. Flooding Consistency
Piping Consistency
  • Purpose: This icing is used to outline the cookie and add intricate details. It should be thick enough to hold its shape and not spread out.
  • How to Achieve It: Start with your basic royal icing and gradually add water, a few drops at a time, until the icing is thick but still smooth. It should form stiff peaks when you lift the spoon out of the bowl. If you draw a line with this icing, it should hold its shape and not flatten out.
  • Uses: Outlining cookies, adding borders, creating detailed designs like writing, leaves, or flowers.
Flooding Consistency
  • Purpose: This icing is used to fill the surface of the cookie and cover large areas. It is much thinner than piping consistency and spreads easily.
  • How to Achieve It: Start with your basic royal icing and add water, one teaspoon at a time, until it reaches a more liquid state. The icing should flow smoothly and flatten out within 10-15 seconds after being drizzled back into the bowl.
  • Uses: Flooding the inside area of the outlined cookie, creating a smooth base layer, marbling techniques.
Decorating Cookies After Baking
You can decorate cookies immediately after they are completely cooled. Decorating warm cookies is not advisable as the heat can cause the icing to melt and ruin your designs.
How to Decorate Sugar Cookies (Based on Sally's Baking Addiction)
  1. Cooling: Allow cookies to cool on the baking sheet for 5 minutes, then transfer them to a wire rack to cool completely.
  2. Setup: Place cooled cookies back on baking sheets for easy handling and, if needed, refrigeration to set the icing.
  3. Decorating: Use the piping and flooding techniques described above to decorate your cookies.

Letting Cookies Sit Before Icing

  • Why Wait?: The warmth from freshly baked cookies can cause royal icing to melt and colored sprinkles to bleed, making it difficult to achieve clean, crisp designs.
  • Recommended Wait Time: Let the cookies sit at room temperature for at least 30 minutes, or until they are fully cooled to the touch.

Icing Drying Time

  • Thin Layers: Icing dries completely in about 2 hours at room temperature if applied in a thin layer.
  • Thicker Layers: If the icing is too thick or too runny, it will take longer to dry. For thicker applications, allow additional drying time to ensure the icing sets properly.

How to Easily Decorate Sugar Cookies

  1. Outline the Cookie: Use piping consistency icing to create a dam around the edge of the cookie. Pipe around the shape in one unbroken line.
  2. Flood the Cookie: Use flooding consistency icing to fill in the outlined area. Work quickly to spread the icing evenly.
  3. Fill in the Gaps: Use a toothpick or scribe tool to spread the icing into any gaps and pop any air bubbles.
  4. Add Decorations: While the icing is still wet, add colorful sugars, candies, nuts, or other decorations. Let your creativity shine!

Tips for Success

  • Practice Piping: Practice on parchment paper before decorating actual cookies to get a feel for the right pressure and movement.
  • Experiment with Techniques: Try different techniques like marbling, wet-on-wet designs, or using stencils.
  • Keep Icing Covered: Royal icing dries quickly, so keep it covered with a damp cloth when not in use to prevent it from hardening.

By following these detailed steps and tips, you’ll be able to create beautifully decorated cookies with royal icing that are perfect for any occasion. Enjoy the process and let your creativity flourish!

Similar photos like How to Decorate Cookies

Best Cream for Every Skin Type with DIY Recipes

Best Cream for Every Skin Type with DIY Recipes

1. Dry Skin
Best Cream: Rich Hydrating Cream
Description: Dry skin needs deep hydration and nourishment. A rich, emollient cream that contains ingredients like shea butter, hyaluronic acid, and natural oils is ideal. These ingredients help lock in moisture, provide essential fatty acids, and form a protective barrier to prevent further dehydration.
DIY Recipe:
Ingredients:
  • 1/4 cup shea butter
How to eliminate Dark Circles

How to eliminate Dark Circles

Cold Compresses:
    Wrap a few ice cubes in a clean cloth and place them on your eyes for 10-15 minutes.
    You can also use chilled spoons or cold tea bags (green or black tea).
Cucumbers:
    Cut fresh cucumbers into thick slices and place them on your eyes for about 10-15 minutes. Cucumbers have cooling properties that help reduce puffiness and dark circles.
Potatoes:
How to get rid of belly in 10 days - menu

How to get rid of belly in 10 days - menu

Losing belly fat in 10 days is a challenging goal that requires a combination of diet, exercise, and lifestyle changes. While significant weight loss in such a short period might not be sustainable or healthy, you can certainly make strides towards a healthier lifestyle and reduce bloating. Here’s a plan with a sample menu to help you get started.
Dietary Tips
  1. Calorie Deficit: Ensure you consume fewer calories than you burn.
How to Lose Belly Fat Quickly?

How to Lose Belly Fat Quickly?

Losing belly fat is a common goal for many people due to health and aesthetic reasons. Excess abdominal fat is associated with an increased risk of heart disease, type 2 diabetes, and other health issues. Here is a comprehensive guide that covers diet, exercise, sleep, and stress management.
1. Diet
a. Reduce Sugar and Sugary Drinks
  • How it helps: Sugar contains fructose, which can accumulate as fat in the abdomen, contributing to belly fat.
The best Apple Pie ever

The best Apple Pie ever

Best Apple Pie Recipe
Ingredients:
For the Crust:
  • 2 ½ cups all-purpose flour
  • 1 teaspoon salt
  • 1 tablespoon granulated sugar
  • 1 cup unsalted butter, cold and cut into cubes
  • 6-8 tablespoons ice water
For the Filling:
  • 6-7 medium-sized apples
  • ¾ cup granulated sugar
  • ¼ cup brown sugar
How to get a new figure in four weeks

How to get a new figure in four weeks

Getting a new figure in four weeks requires a combination of proper nutrition, consistent exercise, and healthy habits. Here's a comprehensive plan:
Week 1: Establish the Foundation
Nutrition:
  • Clean Out the Kitchen: Remove junk food and unhealthy snacks.
  • Meal Prep: Plan and prepare balanced meals for the week. Focus on whole foods like lean proteins, vegetables, fruits, whole grains, and healthy fats.
How to Get Rid of Pimples?

How to Get Rid of Pimples?

Pimples, or acne, can be a frustrating skin condition. However, there are effective strategies and products to help manage and reduce them. Here’s a comprehensive guide to getting rid of pimples:
**1. ** Maintain Proper Skincare Routine
  • Cleansing: Use a gentle, non-comedogenic cleanser twice daily.
  • Exfoliating: Exfoliate 1-2 times a week to remove dead skin cells, using a mild exfoliant with salicylic acid or glycolic acid.
Grimace Shake Recipe

Grimace Shake Recipe

What is the Grimace Shake?
 
The Grimace Shake is a special drink released by McDonald's in June 2023 as part of the celebration of Grimace's birthday. Grimace is one of McDonald's iconic characters, known for his purple color and friendly personality. The Grimace Shake quickly became an internet sensation, with people sharing it on social media and creating memes, videos, and stories related to the drink.
How do you make a First Holy Communion cake with an angel on it?

How do you make a First Holy Communion cake with an angel on it?

Heavenly First Holy Communion Cake with Fondant Angel Figure
Overview: This exquisite First Holy Communion cake is a breathtaking centerpiece designed to celebrate this significant spiritual milestone. Covered in pristine white fondant and adorned with an intricately crafted fondant angel figure, this cake combines elegance, symbolism, and artistic detail to create a memorable and meaningful confection.
Cake Structure:
 Diets for rapid weight loss: Which ones really work?

Diets for rapid weight loss: Which ones really work?

1. Ketogenic (Keto) Diet
  • Description: High-fat, moderate-protein, very low-carb diet that shifts the body into ketosis, burning fat for fuel.
  • Typical Foods: Meat, fatty fish, butter, eggs, avocados, nuts, oils, low-carb vegetables.
  • Pros: Effective for rapid weight loss, reduces appetite, can improve insulin sensitivity.
How to lose weight fast

How to lose weight fast

1. Grilled Chicken Salad with Avocado and Spinach
Ingredients:
  • 1 grilled chicken breast (about 4 oz)
  • 2 cups fresh spinach leaves
  • 1/2 avocado, sliced
  • 1/4 cup cherry tomatoes, halved
  • 1/4 cucumber, sliced
  • 1 tablespoon olive oil
  • 1 tablespoon balsamic vinegar
  • Salt and pepper to taste
Instructions:
How do you make a First Holy Communion cake with a cross on it

How do you make a First Holy Communion cake with a cross on it

Cake Description

Cake:

The cake is a sophisticated and elegant creation, perfect for special occasions such as baptisms, first communions, or confirmations. It consists of multiple layers of moist sponge cake, lightly soaked in syrup to enhance the flavor and texture. The layers are filled with a creamy filling that can be customized to taste, such as vanilla, chocolate, or fruit-flavored cream. The entire cake is then covered in a smooth layer of fondant, giving it a flawless and polished appearance.

Fondant:

What are Antioxidants, where are they found and why are they useful. Here are some recipes for the daily amount

What are Antioxidants, where are they found and why are they useful. Here are some recipes for the daily amount

What Are Antioxidants?
Antioxidants are compounds that inhibit oxidation, a chemical reaction that can produce free radicals leading to cellular damage. They neutralize free radicals by donating an electron, preventing the chain reactions that damage cells and contribute to aging and diseases such as cancer and heart disease.
Sources of Antioxidants
Antioxidants are naturally found in a variety of foods, primarily plant-based ones. Common antioxidants include:
How do you make a Confirmation cake?

How do you make a Confirmation cake?

Detailed Description of the Confirmation Cake

Overall Appearance

The cake is a three-tiered masterpiece, each tier meticulously covered in a smooth, pristine white fondant that serves as a canvas for intricate decorations. The cake stands approximately 14 inches tall, with the tiers graduating in size from 10 inches, 8 inches, to 6 inches in diameter. This elegant design reflects the solemnity and joy of a Holy Confirmation celebration.

Bottom Tier

Best natural Face Creams and Recipes

Best natural Face Creams and Recipes

Best Natural Face Cream Description

Key Characteristics

  1. Hydration: Natural oils and butters provide deep hydration, helping to maintain moisture balance and prevent dryness.

  2. Nourishment: Ingredients rich in vitamins, antioxidants, and fatty acids promote skin health, repair damage, and support regeneration.

  3. Soothing Properties: Anti-inflammatory and calming components help reduce redness, irritation, and soothe sensitive skin.

The best anti-wrinkle mask - How do you make it?

The best anti-wrinkle mask - How do you make it?

Creating the best mask for dry skin involves selecting ingredients known for their hydrating, soothing, and nourishing properties. Here’s a detailed guide on ingredients, their benefits, and a step-by-step method to make and use the mask.
Ingredients and Their Benefits
  1. Avocado
    • Benefit: Rich in healthy fats and vitamins A, D, and E, avocado deeply moisturizes and nourishes dry skin, promoting a soft and supple texture.
Introduction to Vegetarian and Vegan Diets

Introduction to Vegetarian and Vegan Diets

Vegetarianism and veganism are popular lifestyle choices centered around the exclusion of animal products from one's diet. While both focus on plant-based eating, there are critical differences:
  • Vegetarians abstain from meat but may consume dairy, eggs, and other animal-derived products.
  • Vegans avoid all animal products, including meat, dairy, eggs, and often other by-products like honey and gelatin.
How to Make Cakesicles - Easy Homemade Cakesicle Recipe

How to Make Cakesicles - Easy Homemade Cakesicle Recipe

Making cakesicles is a fun and creative way to enjoy cake in a portable, popsicle-like form. Here's an expanded and detailed step-by-step guide to making delicious and visually appealing cakesicles:
Ingredients:
  • Sponge Cake:
    • 4 eggs
    • 100 g sugar
    • 120 g flour
  • Frosting:
    • 250 g mascarpone
    • 2 large spoons of Nutella
How to Make Money from Home

How to Make Money from Home

Earning money from home has become increasingly viable with advances in technology and changes in work culture. Here’s a detailed overview of various ways to earn money from home:
1. Freelancing
Description:
Freelancers provide services on a project or contract basis, often using platforms like Upwork, Freelancer, or Fiverr. Services can include writing, graphic design, programming, marketing, and more.
Pros:
  • Flexible work hours.
Hair Transplantation: A Comprehensive Guide

Hair Transplantation: A Comprehensive Guide

1. Overview of Hair Transplantation
Hair transplantation is a surgical procedure that moves hair follicles from a part of the body (donor site) to a bald or balding part of the body (recipient site). This minimally invasive procedure is primarily used to treat male pattern baldness but can also address hair thinning in women and restore hair in areas such as the eyebrows, eyelashes, and beard.
2. Types of Hair Transplant Techniques
  1. Follicular Unit Transplantation (FUT)

Pages